Popular Posts

Showing posts with label trik dan Tips. Show all posts

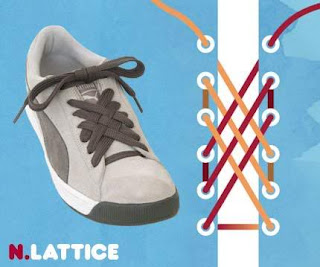
Tips Cara mengikat sepatu yg keren

Saturday, August 27, 2011

Hai Semuanya..
Kali ini saya Ingin Berbagi Ilmu.. tetapi bukan ilmu dalam bidang Blog blog an..
hehe... kali ini saya akan berbagi ilmu tentang mode,style.. biasanya sih yang suka gaya-gaya neh.. :) biar di bilang gaul "begituh...! :D
ok lah.. dari pada kebanyakan cincong mending kita mulai aja..
baik lah...kali ini yang ingin saya bagi ilmu yaitu..
tips cara mengikat sepatu yang keren seperti yang sudah tertera dalam judul postingan.

Nah ini dia cara-caranya :


Dah Pengen Nyobain ya.. hehe.. Moga Berhasil ya.. dan kelihatan keren deh tuh sepatu.
eits.. satu lagi nih... bila ingin terlihat tuh tali sepatu..dicocokin dengan celana panjang ya.. tapi jangan terlalu panjang.. biar terlihat gitOoh.. hehe..


Techniques for Dealing with Threats Ramnit

Saturday, August 20, 2011

Jakarta - The first half of 2011 is owned Ramnit, Ramnit ranked first until June 2011 as the most malware infecting computers in Indonesia based on data processed by a laboratory virus Vaksincom (see Figure 1).

Until now many variants produced by the virus Ramnit nevertheless this virus has the traits, characteristics and the same action, the parent file name was not changed to keep using the file name WaterMark.exe.

Picture 1. Statistical spread of the virus Ramnet first semester (June 2011), 
source: Data Research Vaksincom 2011

Media Distribution

To spread itself, Ramnit will utilize various media such as:

* USB Flash, by creating a file:

o autorun.inf
o Copy of Shortcut to (1). Lnk
o Copy of Shortcut to (4). Lnk

* Create a file in the folder RECYCLER virus with the extension. CPL and EXE files and infects an application (EXE), DLL and HTM / HTML.
* Exploit the vulnerability of Windows MS10-046 http://www.microsoft.com/technet/security/bulletin/ms10-046.mspx KB2286198
* Internet, Ramnit spread over the Internet can occur when a user accesses htm or html file from the webserver that has been injected by Ramnit.
* Network (LAN / WAN) by injecting file EXE / DLL / HTM / HTML on the folder / drive on the share.

Infection targets

At Ramnit infects a computer it searches for and infects files that have the extension EXE, DLL and HTM / HTML in all drives, including removable media. The interesting thing here is Ramnit have the ability to insert the virus code on each file HTM / HTML encountered.

At the time the victim opens the file HTM / HTML that are already infected Ramnit will automatically create a file called "svchost.exe" in the folder [C: \ Documents and Settings \% UsernamePC% \ Local Settings \ Temp]. After successfully creating the file "svchost.exe", ramnit will run the file so it will form a new file with the name "svchostmgr.exe" in the same location, would then create the file "WaterMark.exe" as the master file in the specified location.

File "WaterMark.exe" this for a while will be active in memory and then will mendompleng to the process "svchost.exe" Windows, so the process is performed in memory rather than file "WaterMark.exe" but "Svchost.exe" which will be active with userPC% username% (% userPC%, is the user account that is used during Windows login). (see picture 2 and 3)

Picture 2. Ramnit who boarded the virus in 
the process [svchost.exe] Windows and injection files

Picture 3. Windows svchost process that protects Ramnit

With the ability to inject file HTM / HTML (see Picture 4 and 5), will facilitate in an attempt to spread itself, especially if already infected Ramnit Web Server, so that when the user accesses web pages that are already infected the victim's computer will be directly infected by Ramnit.
Picture 4. Injeksi Ramnit di file htm / html

Picture 5. Injection and contains executable files Ramnit own master

If victim execute EXE files that have been infected by Ramnit, it will display a new file by adding a string MGR after the file name (see Picture 6).

Picture 6. Examples of files that have been infected with 
viruses and virus duplicate files

Uniting We Stand, Divorced Friends reconcile

Like the saying goes cigarette advertising, United We Stand Divorced Friends reconcile. By the time the computer is infected Ramnit, he would invite his friends like Virut or Sality who have the ability to infect application files (EXE), so that in a single application file (EXE) often found infected with more than one virus other than Ramnit (example: Sality or Ramnit), if this happens then you will be reminded of another adage. Have fallen, crushed and torn pants stairs again.

PREVENTION STEPS

How to make your PC immune to attack Ramnit?
From the results of lab analysis Vaksincom, current virus Ramnit "always" using the master file with the same name ie "WaterMark.exe" although its storage location varies depending on the variant that infects the computer and create files "Explorermgr.exe" in directory [C: \ Windows], the file "Explorermgr.exe" is created if Ramnit managed to infect a file "Explorer.exe".

So that your computer does not become victims of malignancy Ramnit, here are some tips and tricks for your computer to be immune from attack Ramnit.

1.Buat dummy folder (empty folder) with the name "WaterMark.exe" and "svchost.exe" in the usual location in the drill by a virus, then change the file attributes to Hidden, System and Read Only. This step is done so that Ramnit can not make the main virus file in the same location.

2.Buat file "Recycler" on each drive, then change the attributes to Hidden, System and Read Only. This step is done so that Ramnit can not create a master file (in the form of an EXE extension and CPL) to a RECYCLER file. RECYCLER because this form of file (not a FOLDER) then Ramnit will not be able to make virus file in that location.

3.Buat 2 (two) the registry key in the following locations:
HKEY_LOCAL_MACHINE \ SOFTWARE \ Microsoft \ Windows NT \ CurrentVersion \ Image File Execution Options (see figure 7)
Key: Explorermgr.exe and WaterMark.exe
String value: Debugger
Type: REG_SZ
Data value: ntsd-d

Picture 7. String registry to block Ramnit not to be active in the computer

This step is done, so that the script / code of existing viruses on Ramnit virus file can not be executed, so Ramnit not be active in memory.

Kanuragan for USB Flash

As noted previously, Ramnit will also spread itself by making use of USB Flash media to make some virus files, the following tips and tricks to Ramnit can not create a master file into a USB Flash Media

1. Khusus for files with extensions EXE / DLL / HTM / HTML should be in a compress using the program WinZip / WinRAR so that the virus does not infect the file, if necessary use a password.

2. Buat empty folder with the name [autorun.inf]. In order for the [autorun.inf] is not deleted by a virus create an empty folder in the folder [autorun.inf] with characters that are not recognized by Windows as CON and NUL. If the folder [autorun.inf] is in the clear will of failure to display an error message. We recommend that you change the attributes to Hidden, System and Read Only (see Picture 8 and 9)

Picture 8. Make the autorun.inf file

Picture 9. Error message when deleting the autorun.inf file

3. Buat empty folder with the name "Copy of Shortcut to (1). Lnk", "Copy of Shortcut to (2). Lnk", "Copy of Shortcut to (3). Lnk" and "Copy of Shortcut to (4 ). lnk ", then change the attributes to Hidden, System and Read Only.

4. Buat file "Recycler", then change the attributes to Hidden, System and Read Only.

5. Buat MSO.SYS empty folder with the name, then change the attributes to Hidden, System and Read Only.


Tips to flash format with NTFS File System

Saturday, August 13, 2011

Some of us may barely pay attention to the type of file system used our stick, whether it is NTFS, FAT32 or FAT. To find out the file system used, right-click the flash in Windows Explorer and select Properties. There looks the type of File System is used.

But when we try to format through Windows Explorer, maybe there is no menu NTFS, the only FAT32 and FAT. How to format NTFS and what is the difference with FAT32 and FAT?

Tips to flash format with NTFS File System
Category Hardware, Tips & Tricks | Seen 91.057 times | 98 Comments
Format NTFS

Some of us may barely pay attention to the type of file system used our stick, whether it is NTFS, FAT32 or FAT. To find out the file system used, right-click the flash in Windows Explorer and select Properties. There looks the type of File System is used.

But when we try to format through Windows Explorer, maybe there is no menu NTFS, the only FAT32 and FAT. How to format NTFS and what is the difference with FAT32 and FAT?


fat32-file-system

Why NTFS?

NTFS is the format of the latest Windows system files after FAT32, and has several advantages such as the ability to store additional information about a file / folder (metadata), security features, data compression, better structure and others.

In addition, the type of NTFS can be used to format the larger size, only 2 GB for FAT, FAT32 8 TB (8,000 GB), while NTFS can be up to 16 EB (16 million TB). Nevertheless, there is still NTFS drawbacks, such as unreadable in the Win9x and the process of reading and writing to disk more often.

Because each file / folder store more information (metadata), then the process of reading and writing each file / folder will more often than FAT32 or FAT type, so for the flash, affecting the life (durability). Given flash memory have limited literacy. (Article about keeping to be more durable flash can be read here: Characteristics and Tips to keep the stick more durable)

Enabling NTFS format in Windows Explorer

Can we format the USB stick with NTFS type with the help of the HP USB Format Tools. But the actual Windows Explorer can do it. To enable it to follow the following steps

1.Buka System Properties by right-click My Computer> Properties (or by keyboard buttons Win + Break)
2.Buka Hardware tab and then click the Device Manager
3.Pilih Disk Drive and select the flash that you want to format with NTFS, right click, select Properties.
4.After open select the Policies tab
5.Pilih Optimize for performance and click OK
6.Setelah it try right-clicking the flash drive in Windows Explorer and select the Format menu, then there should have appeared NTFS File System.

Noteworthy is that when this option is enabled, any repeal the flash should always be through the Safety Remove Hardware. If the option is "Optimize for quick removal" is actually the flash can be directly removed, without the Safety Remove Hardware

Test between NTFS, FAT32 and FAT

I have tried multiple comparisons (especially the process of copying the data) with different types, and the results are as follows:

-> Copy the 11 files (each of size about 170 MB) total some 1.8 GB
NTFS 04:44 (4 minutes 46 seconds)
FAT32 5:09 (5 minutes 9 seconds)
FAT 04:46 (4 minutes 46 seconds)
-> 1297 Copy files (size between 1 KB to 23 KB) for a total of 8.23 MB
NTFS 29 seconds
FAT32 56 seconds
FAT 58 seconds
-> Capacity after Format
NTFS 2,038,044,672 bytes Used space is 12,937,216 bytes (12.3 MB)
FAT32 2,046,959,616 bytes 4096 bytes Used space (4:00 KB)
FAT 2,050,686,976 bytes Used Space 0 bytes


Visible copying data with NTFS, relatively quickly, but after the format size is slightly smaller because it needed additional space for larger files / folders (metadata). If the flash is often used for reading and writing process and little need for NTFS features, such as data security, then choose the type of FAT32 may be better.


Cara Membuat Scroll Pada Tabel Label

Wednesday, July 27, 2011

Disini saya akan Membuat trik untuk membuat scroll pada tabel label

Yang tujuannya untuk mempersingkat halaman yang di pergunakan oleh label. mungkin sebagian sobat blogger sudah pada ngerti.. tetapi mungkin sudah ada yang lupa dan bagi sobat blogger yang memang belum mengerti dan ingin mencobanya.. silahkan sobat ikuti langkah-langkah berikut ini..
1. login blog
2. Rancangan >> edit HTML >> centang 'Expand Template Widget'
3. Cari kode dibawah ini ( NB: Harus ada widget labelnya terlebih dahulu )
4. Tekan Ctrl + F untuk memudahkan mencari
5. Cari kode seperti dibawah ini :


<b:widget id='Label1' locked='false' title='Label' type='Label'>
<b:includable id='main'>
<b:if cond='data:title'>
<h2><data:title/></h2>
</b:if>
<div class='widget-content'>


<div style='overflow:auto; width:ancho; height:300px;'>

 <ul>
<b:loop values='data:labels' var='label'>
<li>
<b:if cond='data:blog.url == data:label.url'>
<span expr:dir='data:blog.languageDirection'>
<data:label.name/>
</span>
<b:else/>
<a expr:dir='data:blog.languageDirection' expr:href='data:label.url'>
<data:label.name/>
</a>
</b:if>
<span dir='ltr'>(<data:label.count/>)</span>
</li>
</b:loop>
</ul>
<b:include name='quickedit'/>
</div> </div> </div>

Kalau sudah ketemu tinggal tambahkan saja kode yang warna merah itu untuk fungsi scrollnya.
Angka 300px adalah tinggi kotak scroll. bisa sobat ganti sesuai selera sobat...

Gak ada kode yang seperti <div class='widget-content'> ?????
Tenang gak usah khawatir, mungkin pada template sobat yang ada hanya kode
<div expr:class='&quot;widget-content &quot; + data:display + &quot;-label-widget-content&quot;'>
yah kalau adanya kode di atas ini maka taruh <div style='overflow:auto; width:ancho; height:300px;'> dibawah kode yang berwarna hijau

Nah..Setelah Anda Selesai Trus di Save.. Lalu Lihat Hasilnya..

Semoga bermanfaat.

Changing the look of search engines (Google search)

Monday, July 25, 2011

Bored With Google's view on your computer ..?
You Can Change Display Search engines (Google Search) to display your taste.
Maybe you'll Asks ... Where do I like ..
Okay ..
Well ...
Steps you need to do is as follows:

1. Click here: (http://www.funnylogo.info/extrathemes.asp)
2. Then live input wrote a name corresponding to the choice Heart
3. Choose the style of his
4. have fun with the new look is Google you.

So how are you always look pake every search on Your computer?
Its way easy ..
Copy the URL used to it,

Continue to open the browser settings (FF / IE), paste this URL on the homepage setting the bar.
Done. Have fun with your Google's new look.


Cara Membuat Private Folder + Password

Sunday, July 17, 2011

Anda Mungkin Bingung Bagai Mana Cara Supaya Folder dalam Komputer anda yang anda sediakan untuk menyimpan berbagai file penting aman dari tangan tangan jahil..
disini akan saya bagikan kepada anda-anda untuk menjaga folder anda tetap aman dengan folder private + Password.
Nah,.. langsung aja ya..
caranya begini :

1. buat sebuah folder dengan nama apa saja (contoh disini : New Folder)
2. buka notepad, copy - kan script dibawah ini ke note pad dan simpan dengan nama : "kunci.bat"

Code :


if NOT EXIST Private goto MDLOCKER
:CONFIRM
echo Are you sure you want to lock the folder(Y/N)
set/p "cho=>"
if %cho%==Y goto LOCK
if %cho%==y goto LOCK
if %cho%==n goto END
if %cho%==N goto END
echo Invalid choice.
goto CONFIRM
:LOCK
ren Private "Control Panel.{21EC2020-3AEA-1069-A2DD-08002B30309D}"
attrib +h +s "Control Panel.{21EC2020-3AEA-1069-A2DD-08002B30309D}"
echo Folder locked
goto End
:UNLOCK
echo Enter password to unlock folder
set/p "pass=>"
if NOT %pass%== password here goto FAIL
attrib -h -s "Control Panel.{21EC2020-3AEA-1069-A2DD-08002B30309D}"
ren "Control Panel.{21EC2020-3AEA-1069-A2DD-08002B30309D}" Private
echo Folder Unlocked successfully
goto End
:FAIL
echo Invalid password
goto end
:MDLOCKER
md Private
echo Private created successfully
goto End
:End


pada baris if NOT %pass%== password here goto FAIL
ganti password here dengan password anda

3. nah sekarang kembali ke folder yang anda buat tadi, didalamnya ada file dengan nama "kunci.bat"
4. klik dua kali "kunci.bat", akan muncul sebuah folder dengan nama "Private"
5. copy file-file yang anda anggap perlu di privatekan ke folder "Private" tersebut
6. setelah dicopy file2 yang kita inginkan langsung klik "kunci.bat" lagi, nanti ada pertanyaan
Are you sure you want to lock the folder(Y/N) pilih Y
7. lihat hasilnya

untuk membuka folder tersebut klik dua kali "kunci.bat"
masukkan password anda

Nah Selesai deh.. sekaran pasti Folder Anda akan selalu Aman dari tangan-tangan jahil.

Maen Game Snakes di Youtube

Mungkin Sebagian Pecinta Buffering Via youtube belum tau satu rahasia membuang rasa jenuh saat menanti buffering youtube sampai selesai..
sebenarnya anda bisa sambil menunggu selesai buffering dengan bermain game di layar buffering nya youtube.. tapi bagai mana caranya..? begitu mungkin pertanyaan anda..
ok baiklah... disini akan saya jelaskan satu rahasia menghilangkan rasa jenuh saat menunggu Buffering selesai.

Gini nih caranya,

Waktu buffering video kan muncul kaya bulatan yang bergerak melingkar ditengah tengah video. Nah itu sebenernya ularnya gan. tekan aja tombol arah panah atas pada keyboard. nanti ularnya bisa gerak sesuai tombol yg agan tekan

Monggo di Coba Gan.. semoga Tidak jenuh lagi saat menanti buffering youtube..


Cara Membuat Spoiler Pada Blog

Sunday, July 10, 2011

Saya Akan Membahas tentang Spoiler. Mungkin Sebagian para Blog Mania sudah tau apa itu Spoiler.. Walaupun Begitu.. kan sebagaian yang tau.. hehe.. neh sebagian lagi yang gak tau akan saya beri tahu disini.
Baiklah..
Kita Mulai Membahas tentang Spoiler.. Apa Itu Spoiler ..? mungkin akan begitu Pertanyaa mereka yang Belum mengerti.
Spoiler adalah satu Script yang Dapat Menyembunyikan Sebagian Tulisan (Postingan) Anda. Menyembunyikan bukan berarti tidak bisa terlihat..
sifat dari spoiler ini sendiri adalah.. menyimpan sebagian tulisan anda dengan cara Buka dan Lipat. maksudnya jika anda lipat maka tulisan anda tidak akan terlihat.. dan untuk memperlihatkannya kembali anda tinggal klik maka akan terbuka..
Kegunaannya ialah untuk mempersingkat apabila tulisan anda sangat panjang..dan ini akan mengirit ruangan dalam Blog postingan anda.
Baiklah akan saya beri contoh sebagai berikut :

Buka[Selanjutnya]

Nah.. Seperti contoh di atas.. jika anda mengklik "Buka [Selanjutnya" maka Postingan yang anda sembunyikan akan terlihat.

Sekarang Bagai mana cara membuatnya..

Pertama Siapkan Tulisan anda..
sesuaikan Banyaknya teks yang akan anda perlihatkan di blog anda.. dan sisa tulisan yang akan anda sembunyikan..

<div><div style="margin: 5px;">
<div class="smallfont" style="margin-bottom: 2px;"><i><span style="font-weight: bold;">Judul atau isi konten </span></i><input value="Show" style="margin: 0px; padding: 0px; width: 60px; font-size: 10px;" onclick="if (this.parentNode.parentNode.getElementsByTagName('div')[1].getElementsByTagName('div')[0].style.display != '') { this.parentNode.parentNode.getElementsByTagName('div')[1].getElementsByTagName('div')[0].style.display = ''; this.innerText = ''; this.value = 'Hide'; } else { this.parentNode.parentNode.getElementsByTagName('div')[1].getElementsByTagName('div')[0].style.display = 'none'; this.innerText = ''; this.value = 'Show'; }" type="button"/>
</div>
<div class="alt2" style="border: 1px inset ; margin: 0px; padding: 6px;">
<div style="display: none;">
Isi dari spoiler atau Konten anda
</div></div></div></div>


Perhatikan Teks Yang berwarna..

*warna Biru adalah Judul yang akan anda buat..
*warna Merah adalah Isi dari tulisan yang akan anda sembunyikan.

Setelah selesai.. SAVE dan sekarang Lihat hasilnya..
Kalau Sudah Berhasil.. Jangan Lupa ya Beri sedikit Commentnya.. :)


Cara Membuat Widget Gambar Berjalan Ke-kiri dan Ke-kanan

Saturday, July 9, 2011

Hello.. Ketemu lagi dengan Postingan saya.. :)
Kali ini saya akan membahas tentang cara membuat gambar di blog anda bisa bergerak dari kiri ke kanan ..
Seperti contoh dibawah ini :


Nah.. Untuk cara membuat seperti gambar diatas.. cukup mengunakan Script berikut ini..
<marquee direction="left"><img src="Isi dengan url photo anda "</marquee>


Keterangan :
Pada kode "left" anda bisa merubahnya dengan "up" or "right"
left = Bergerak dari kanan ke kiri
up = Bergerak dari Atas ke Bawah
Right = Bergerak dari kiri ke kanan

Semoga berhasil..


Support : Creating Website | Johny Template | Mas Template
Copyright © 2011. FOLLOWING WITH FRIENDS - All Rights Reserved
Template Created by Creating Website Inspired by Sportapolis Shape5.com
Proudly powered by Blogger